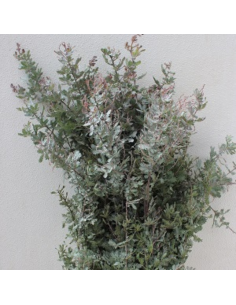
An assorted eucalyptus seasonal box for florists typically includes a selection of fresh eucalyptus varieties, chosen to provide different textures, shapes, and shades of green. This kind of box is designed to offer florists a versatile range of eucalyptus for use in arrangements, garlands, bouquets, and other floral creations.
Here's a breakdown of what you might find in an assorted eucalyptus seasonal box
Mixed Varieties: The box will likely feature a mix of popular eucalyptus types, such as
(large, rounded leaves), Seeded Eucalyptus (textured seeds and soft leaves), Baby Blue Eucalyptus (rounded, bluish-green leaves), Gunni Eucalyptus (compact, silvery-green leaves), Feather, Willow, and Spiral Eucalyptus.
Varying Textures and Shapes: The assortment aims to provide a range of visual interest with leaves of different sizes, shapes, and textures. For example, the large, round leaves of Silver Dollar contrast with the wispy, pointed foliage of Feather and Willow varieties.
Gray/Green Color: Eucalyptus generally features a palette of gray-green leaves with a soft, faded appearance.
Clean Scent: Many varieties of fresh eucalyptus possess a pleasant, clean scent.
Seasonal Availability: While many eucalyptus varieties are available year-round, the exact mix and appearance may vary depending on the season and availability. For example, Seeded Eucalyptus seeds may appear "cupped" in late spring and early summer.
Image may not be an exact representation of actual product.
Versatility in Use: Florists can use the assorted eucalyptus in a variety of ways:
Garlands: Create lush garlands for weddings, events, or home décor.
Arrangements: Add texture, volume, and fragrance to bouquets and centerpieces.
Hand-held Bouquets: Incorporate eucalyptus for a natural and rustic look.
Large Events: Utilize the bulk greenery for decorating venues and creating visually impactful installations.
DIY Wedding Greenery: Assorted eucalyptus boxes are popular for DIY brides and event planners who want to create their own arrangements and decorations
Taking care of flowers purchased in bulk is essential to maintain their freshness and extend their vase life, especially if you're using them for resale, events, or arrangements. Here's a step-by-step guide to help you process and care for bulk flowers:
Initial Processing Upon Arrival
Unpack Immediately
Remove flowers from boxes carefully to avoid damage.
Keep them in a cool, shaded area during unpacking.
Inspect and Sort
Check for damaged or wilted stems and remove them.
Sort by type and stem length if needed.
Hydration Prep
Remove any foliage that will be below the waterline to prevent bacterial growth.
Recut stems at a 45° angle under running water or submerged in water to prevent air bubbles.
Use Clean Containers
Sanitize buckets or vases before use.
Fill with fresh, lukewarm water and add floral preservative (contains sugar, acidifier, and biocide).
Conditioning and Storage
Hydration Period
Let flowers hydrate for 4–12 hours in a cool, dark place before arranging or selling.
Temperature Control
Store at 34–38°F (1–3°C) for most flowers.
Avoid storing near fruits (especially apples) which emit ethylene gas that can age flowers prematurely.
Humidity
Maintain high humidity (around 90%) to prevent dehydration.
Ongoing Care
Daily Maintenance
Change water every 1–2 days.
Recut stems every few days to improve water uptake.
Remove any wilting or dead flowers promptly.
Avoid Direct Sunlight and Heat
Keep flowers away from heat sources, drafts, and direct sunlight.
Use Floral Preservatives
Continue using preservatives with each water change to nourish and protect the flowers.


